Wildcat Creek Brick Company

Wednesday, December 30, 2009

Thinking smaller, getting ready for next firing.

Here are a couple more photos of some of what came out of the Christmas firing of my kiln.
The bricks are really great. The white one in front is one of my favorites.

The large tiles came out very well also.

I went thru alot of firewood last time getting the kiln up to salt glazing temperature. In an expiremental effort to speed up the firing and save fuel, I am reducing the chamber size to salt glaze my pots. I will let you know the results soon.....
All bricked up, waiting for the mud to seal the cracks. I also moved the pyrometer thermacouple probe into the heart of the chamber this time. I hope to get a more accurate reading from it.
Firing is set for sometime this weekend.


Sunday, December 27, 2009

Christmas firing challenge and success

I had been planning to fire up my kiln on Christmas day for a week now. I wasnt sure I was going to be able to stick with it after I injured myself on my left hand on Christmas eve. After a trip to the ER and 5 stiches later, I decided to very carefully go on ahead with the firing. With the help of my wife Jackie, my two sons William and Daniel, and their good friend Brandon, I was able to keep the firebox stoked the needed twelve hours. Even with the wind blowing and temps outside dropping into the upper 20s F they helped me with little complaint. Thanks to all of them for the hard work.


I realy like the salt glaze effect on this candlestick holder. Grey green maybe from the bottle glass dust mixed in with the local Flora clay I am using on these.

My chimney flame arrestor had been working great! No more visits from concerned neighbors or the local police over flames shooting out in full view. lol


I enjoyed using my newly purchased pyrometer off Ebay. I still need to discover the correct location in the chamber to place the thermocoule probe. I was getting readings from it far below the actual temps I knew I was reaching. I must of had it in a cold spot out of the main flow of heat. Better luck next time.

Tiles and bricks came out great! Only lost two tiles to cracks. the white brick and pots are from the streambed creek clay. The low iron content make salt glaze not work well at the temps I can reach. I had much better flow this time thru the chamber for the gases. I found that stacking the bricks longwise to the exit flue with 3/4 inch gaps works good. Much less smoke in the barn this time! I will try to post some more pics of what came out soon.

Wednesday, December 16, 2009

Getting ready for the next firing.

Some of the terracotta tiles I have ready for the kiln firing coming up on my christmas break.


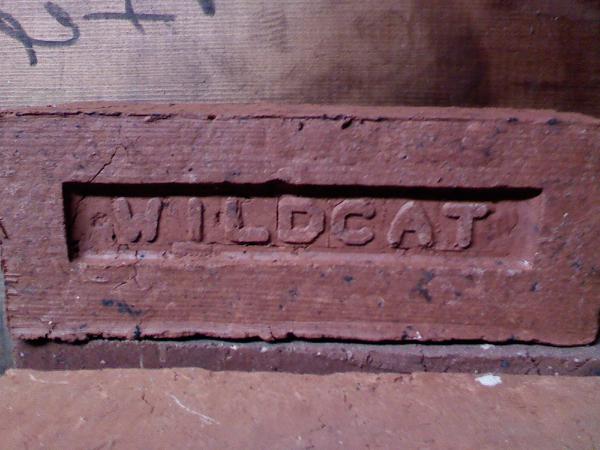
Ive made a new brick frog in honor of the town my latest kiln is located in. Notice the corndog clay insulated thermocouples ive made on the bench.

A few sample Flora bricks drying out ontop of the stove barrel in the barn.


Thursday, December 3, 2009

Salt glazed bricks?

Here are a few photos of bricks I fired in the new kiln here in Flora.

All of them came out good and hard. I was also trying out salt glazing just to see what would happen on the bricks.

All of the ones on the bottom two layers showed the effects of the salt.

The heat must have been more intense the nearer they were to the firebox vents.

I will need to work on how I place them as they tend to sag and crack as they get that hot.

If I can perfect this they would make a very interesting and weatherproof outdoor bbq grill.


Sunday, November 29, 2009

Second firing of the new Flora kiln. Much better.

Changes have been made and the results show much promise! With the help of the forced air blower, taller chimney, and 15 hour firing, my sons and I have hit the temperatures we needed. With this kiln I have learned to be more patient. It is bigger and wakes up slowly, like an old bear from hibernation.

I made some more bricks and a few pots to go along with the refires from last times attempt. The chamber is much fuller than last time . I still am working on the proper placement of everything to get good flow to the flue. Guess it will just take time to learn about this beast!


Some of my young help.

Smoke from the chimney was not to overpowering. Thats a good thing being at the edge of the town where people have to breath all of it if the winds shift to out of the west.


Early on I stoke the firebox alternating left side then right side. This keeps the cold flue and chimney from "choking" on too much gases. As it warms up I begine to stoke both sides together. I can only feed it everything it wants toward the end if the firing. Then its hard to keep up with its hunger.


Its at this point I begin the salt glazing. Nothing fancy, just throwing in a cupfull to each side of the firebox every other stoking. Im not sure how it will glaze though, the pots at the top may not be quite hot enough or not get the full effect of the salt vapors. We will see.


I will post to show the results after the cooldown.

Heres a short video of it for all of you.

Sunday, November 22, 2009

Trial kiln run needs some improvement.

I fired my latest kiln up last saturday on a test run to work out any bugs it may have. There was alot of it that needed improvement! This is my first arched chamber and the location of the exit flue is low. This makes for weak draft until the chimney warms up. It smoked like crazy the first hour or so. Even after that it didnt draw like I wanted until after a few hours stoking.


Since I built this kiln at my new site, I had to bring over everything from the other location I was working at before. I hadnt bothered to bring the blower for the firebox. Wasnt sure I would need it. I think I do. Couldnt get it up past red. I couldnt reach the temperatures needed without it in my short firing timeframe. 1 day. So that little blower is gonna be a must have for this kiln too.


I built the upper part of the chimney in a hurry the days before the first firing. I didnt like its look or the gaps in the brickwork. Neither did the local policeman on duty. lol. That night he payed me a visit worried that the flames he saw shooting up from it were gonna burn down the barn. Guess he wasnt used to seeing chimneys shooting out flames after wood stoking. I have since rebuilt it taking the time to do it right and make it a couple feet taller for better draft.

Ive found a new sorce of field clay I am excited about that it seems to work much better. I will post when I have some results for all of you to see.

Tuesday, November 10, 2009

My first brick kilns video

Here is a short video record of my brick and pottery kilns.


Monday, November 9, 2009

A new kiln

I am constructing a new kiln. This one will take all that I have learned and put it together in a new indoor barn kiln.


Update on my wood furnace construction

Ive been working here and there on the brick building that houses my outdoor wood furnace boiler. I have recently added the archway over the door frame. I think im getting the hang of laying bricks and mortar now. Not a pro, but im satisfied with it.

Tuesday, October 27, 2009

More salt glazing practice.

Here I am again firing some clay pots and tiles. Some pots are refired to try to put glaze on the sides that didnt get any last time. I think I may have gotten the kiln a bit hotter this time from the color of the glow. Took me about 8 hrs because of the cool wind early on. I also used alot more salt at the end this time.


I had a few tiles and one vase from the last firing that had really good glaze coverage this time. The rest will need to go back in again to get glazed fully. My crummy kiln is probably the main cause of the partial glazing.


Here are some results to share with all of you!

I wonder why red clay turns almost black when salt glazed. Is it the heat or carbon from reduction firing.


The tile warped because I had it leaning against a brick.


Here are the pots that didnt get a full glaze effect from the salt.
They will have to go back in for a second try. I will place them in different locations of the kiln to even the glaze out. The back of the chamber seems to get the best glazing effect. Must be the way the gasses are flowing to the chimney flue.

Tuesday, October 13, 2009

My first try at salt glazing. Very cool!

I fired a few quickly made pieces of red clay pottery and tiles. It took about 7 hours total to fire. Let it cool down overnight and the next day, then unloaded it. Over the last hour of firing, I added about 20 lbs of rocksalt to the firebox while stoking the fire. About 2 cupfulls at a time. This is how it turned out! I will have to consider placement of the pots and tiles next time.
I am wondering if I could place the same pottery back in again facing the other side to complete the glaze. I will let you know if it works out.


Sunday, September 20, 2009

The volcano erupts again!

Another week has passed and I have looked over my results from the last firing. I made some nice pottery last week but didn't tell you much about the bricks. They were bad! Very over fired. I have made some changes and went at it again. My results are much better this week.

I had too coarse a mix of glass fragments in the clay. That made for glass to melt out of the bricks.
That along with placing them stacked ontop of eachother also supporting the weight of the kiln top too much. The heat destroyed them into glued together ckinkers.

I lowered the entry point of the chimney flue and added a metal door to the front of the firebox.

I also took the stacked weight off of the green bricks by putting firebrick support posts inside the heating chamber to hold the kiln rooftop up. The new clay/glass mix is still 50/50, but the glass is tripple sifted to the mesh size of wire window screen.

This is the result of that effort!

My last name is Hendrix, but my wifes family name is Kennedy. So her brother asked me about bricks with their name on them. All the bricks passed the water submersion testing with no ill effects.